
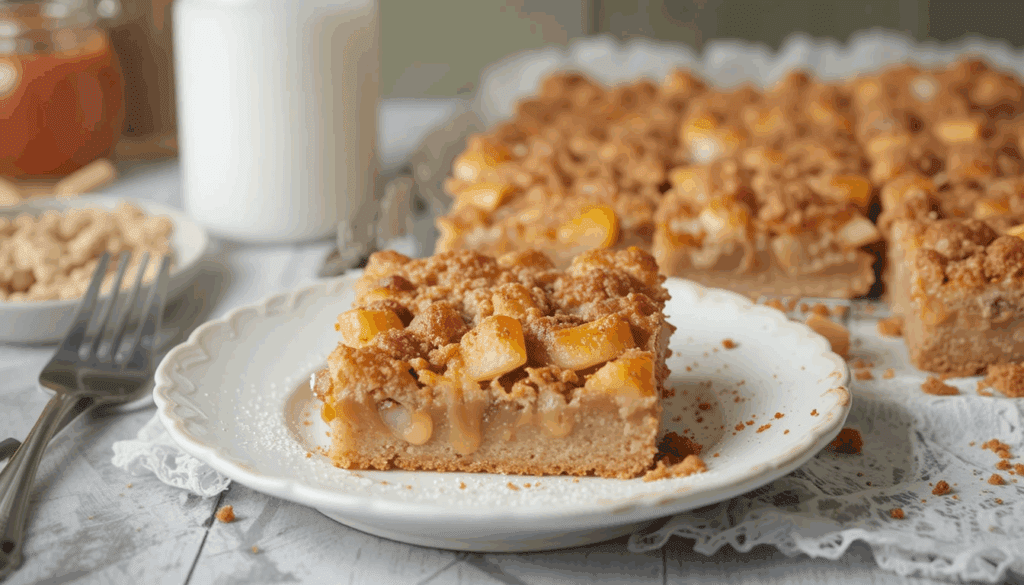
There’s something really special about the smell of warm apple desserts floating through your home. These Flaky Apple Pie Bars bring back that old-school comfort but in a much easier way than baking a full pie. They are crisp, buttery, and sweet, with that perfect apple-cinnamon flavor that always makes people go “mmm.” It’s like holding a little piece of cozy fall in your hand.Flaky Apple Pie Bars That Taste Just Like
What Makes These Bars So Good
The texture, that’s the first thing you’ll love. The crust is crisp but still soft inside, and the filling melts in your mouth. I think it’s because of the butter, honestly. There’s a lot of butter in this recipe, and that’s what makes the flaky layers happen.
Also, they don’t need a pie dish. You can bake them right in a rectangular pan. So it’s easy, quick, and less messy. You can even pack them for picnics or serve at parties. My aunt used to bake them for church events, and they’d disappear before anyone touched the brownies.
Ingredients You’ll Need for Flaky Apple Pie Bars
You probably already have most of these in your kitchen. That’s another reason this recipe’s great—it’s simple.
-
2 cups all-purpose flour
-
½ teaspoon salt
-
1 cup cold unsalted butter (cut into cubes)
-
2 large eggs (one for dough, one for brushing)
-
5 medium apples (peeled, sliced thin)
-
¾ cup sugar
-
1 teaspoon cinnamon
-
1 tablespoon lemon juice
-
1 tablespoon cornstarch
-
A bit of powdered sugar (for topping)
If you like, add a pinch of nutmeg or brown sugar for a deeper flavor.
How to Make the Crust
Making the crust is where all the magic happens. Mix flour and salt in a large bowl. Cut in the butter using a pastry cutter or even a fork if you don’t have one. The mixture should look crumbly, kinda like sand.
Then add one egg and mix until the dough starts coming together. It might look a little dry but don’t worry. Once you press it in the pan, it’ll smooth out nice. Split the dough in half. One part will be for the bottom crust, and the other for the top.
Roll out one half and press it into a greased rectangular baking pan (around 9×13 is fine). Try not to overwork it, or the crust will get tough instead of flaky.
Making the Apple Filling (Simple but Tasty)
In a big bowl, toss the apple slices with sugar, cinnamon, lemon juice, and cornstarch. This part smells amazing already. The cornstarch helps thicken the filling so it’s not too watery when baked.
Some people like to sauté the apples before baking, but I don’t think it’s necessary here. The oven does all the work, and the apples come out tender but not mushy.
Layering Everything Together
Now spread the apple mixture evenly over the crust. Make sure there’s no big gaps or clumps. Roll out the second half of dough and place it on top. It doesn’t have to look perfect—rustic is fine.
Beat the other egg lightly and brush it over the top crust. This makes it golden brown and gives it that nice bakery-style look.
Baking and Finishing Touches
Bake in a preheated oven at 375°F (190°C) for about 35–40 minutes. Keep an eye on it after 30 mins because ovens can act weird sometimes. The top should be a light golden color and the edges a bit crispy.
Let it cool before cutting. I know, it’s hard to wait when it smells that good, but if you slice too soon, the filling might run out. Once cooled, dust a little powdered sugar on top. It gives a soft, sweet finish that looks fancy without even trying.
Little Tips That Make a Big Difference
-
Use cold butter always. That’s what gives you layers and flakiness.
-
Don’t skip the lemon juice—it brightens the apple flavor.
-
If the top crust cracks, that’s ok. It still tastes great.
-
You can refrigerate the bars, but they taste best the day they’re baked.
Variations You Can Try
If you’re the type who likes to experiment, here’s a few fun twists:
-
Caramel Apple Bars – Drizzle caramel sauce over the filling before adding the top crust.
-
Crumble Topping – Skip the top crust and sprinkle an oat-sugar mix instead.
-
Glazed Version – Mix powdered sugar with milk and drizzle over cooled bars.
-
Savory Spin – This sounds strange, but try a pinch of sea salt on top. It’s oddly good.
Why Everyone Loves These Bars
They’re so easy to serve and eat. No fork needed. Just pick one up and enjoy. Plus, the flavor balance is perfect—sweet, buttery, and just a tiny bit tart. Kids love them, adults too. They look homemade, which is part of their charm.
Also, they keep really well. Store them in an airtight container at room temp, and they’ll stay fresh for 2–3 days. You can reheat in the oven for a few minutes if you want that fresh-baked crisp again.
Fun Fact (sort of)
Did you know apple pie wasn’t actually invented in America? It’s true! The original recipe comes from England, but over time, people in the U.S. made it their own. The “bars” version, though, that’s a modern twist—probably from busy bakers who didn’t have time for a full pie.
Common Mistakes to Avoid
Even simple recipes have pitfalls, so here’s what to watch out for:
-
Using warm butter. It ruins the texture, really.
-
Overmixing the dough—it gets chewy instead of flaky.
-
Not letting it cool. That’s when everything falls apart (literally).
-
Adding too much sugar. It can make the filling too sticky.
Serving Ideas for Your Flaky Apple Pie Bars
These bars taste amazing on their own, but you can dress them up a bit:
-
Add a scoop of vanilla ice cream on top.
-
Warm them up and serve with whipped cream.
-
Sprinkle a little cinnamon-sugar mix before baking for extra flavor.
-
Pair with hot coffee or even spiced tea. Perfect for cold days.
A Note About Apples
Any apple works, but the best mix is tart and sweet together. Try Granny Smith and Honeycrisp. If you use only sweet apples, the flavor might end up flat. And always peel them—otherwise the skin gets chewy.
A Quick Recap of the Steps (for easy remembering)
-
Make the dough and divide it in half.
-
Prepare the apple filling.
-
Layer crust, filling, then top crust.
-
Brush with egg, bake until golden.
-
Cool, cut, and dust with powdered sugar.
That’s it! Simple, flaky, golden apple bars that bring joy every single time. They may not look picture-perfect, but that’s kinda the point. Homemade desserts are supposed to have that warm, cozy feel.